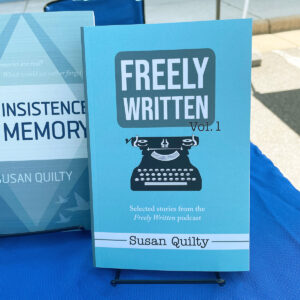
Here’s a fun fact: my new book, Freely Written Vol. 1 went from concept to print in about two weeks. Yep, two weeks! While quick turn around is one of the benefits of self-publishing, that was a little crazy even for me.
Why the quick release? And why did the print edition come out nearly two months before the ebook edition? (Which is out now!) There’s a little story behind that…
The Print Edition and a Public Event
My Freely Written podcast, which features free-written short stories, had been out for about a year when I was invited to the 2nd annual Comic Logic Lot Con. I’d been toying with the idea of publishing some of its stories in a book, and getting it done before this local event seemed like a great idea!
The trouble? I was pretty short on time. Ordering inventory could take three weeks, which left me with less than three weeks to pull the whole book together. Totally doable. Right…?
Well… I do like a challenge. (Have you seen the wacky plans behind my choose-your-ending book?!)
Getting Started
My first step was to create a to-do list. I already had the written stories from the podcast, so I only had to choose which stories to include. Then write an introduction and some additional copy, create a print layout, design a cover, register an ISBN, publish the book, and order inventory. (Yikes!)
Choosing stories could have been tough, but I decided to keep it simple. There were a few personal favorites that I had to include (Grocery Store Sushi, Membership, The Goose in the House). I then checked the stats on my podcast to see which stories had the most downloads, and I already had a mental list of the stories that had generated the most feedback.
As I brought stories into my InDesign layout, I let the length of the book help me decide how many to include. I wanted it to be a thin, portable book that had stories in several different styles. Something for everyone. Twenty stories ended up being a nice round number that fit well.
Creating the Print Layout
I use InDesign for my print layouts, and it’s more involved than simply copying in the text of the stories. The margins have to be carefully set and certain design elements, like chapter titles, need to match throughout the book. There are also typesetting standards that create a more professional look, such as adjusting the text so it breaks across pages without leaving single paragraph lines stranded at the tops or bottoms of pages (widows and orphans).
For this book, I also set up running headers that would show the title of each story in the appropriate sections. In InDesign, I use parent pages (previously called master pages) to manage running headers and page numbering. Some people also use parent pages to align chapter titles, but I use some tricks with a custom baseline grid and paragraph rules instead.


With any book, I largely use paragraph styles to manage the specific elements, such as chapter titles, lead paragraphs, and section breaks. The styles are applied throughout the book, avoiding inconsistencies. For example, if I change the font style or size on a chapter title, that change will automatically apply to all of the chapter titles.
Designing the Cover
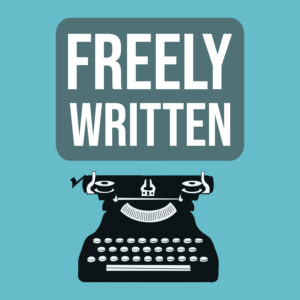
The cover for Freely Written Vol. 1 had an easy start because I’d already designed the logo for the podcast. (I drew the typewriter in ProCreate and added the text in Photoshop). But turning that logo into a book cover still took some work.
For one thing, the logo is square, while the book cover is 5.25 by 8 inches. Sticking the logo in the center of the cover would leave a lot of empty space above and below. I also needed to add my name and the “Vol. 1” marker (in case I want to publish a Vol. 2 someday!), write copy for the back, and design the spine.
I kept the design simple, separating the title from the typewriter enough to slip in the “Vol. 1” and filling the space below with a mention of the podcast. The white space and teal line behind my name added a little grounding to the open design and carrying it through to the back cover continued the design.

Publishing the Book
After finalizing the interior layout and cover files, I was ready to publish. For print distribution, I use both KDP (Amazon) and IngramSpark. They each have their own uploading systems, which require setting up all of the book’s metadata (title, description, BISAC codes, etc.) as well as pricing and distribution information. Before I can upload to either, the book needs to be assigned an ISBN, which is kind of like a book’s Social Security Number.
It’s a lot of information to manage. You also have to use different ISBNs for each version of your book (paperback, ebook, audiobook, hard cover, etc.). But, like anything, it becomes easier to manage with practice.
Usually, I publish through KDP first because I like their system and online previewer. I then order a physical proof for a final check before hitting the publish button and moving on to IngramSpark. This time, I took a chance on skipping the physical proof. Luckily, the book looks great in person!
Success and Next Steps
After all of that, the books arrived in plenty of time for the event. Huzzah! It was a great day of seeing old friends and meeting new readers. You can read more about the event here: Comic Logic Lot Con 2022.
Normally, I would create my ebook files before publishing and put both editions out at the same time. With this project, I didn’t have the time. Honestly, I barely squeezed in the time to get the print edition finished before the event! Still, I wanted to make an ebook available, so I finally found some time to knock it out.
Creating the Ebook Layout
For ebooks, I distribute through both KDP (Kindle) and Draft2Digital, which then publishes to Nook, Apple Books, etc. The file format I use for my ebooks is called an EPUB. There are many places where you can have a book converted to EPUB (including Draft2Digital), but I prefer to create my own through InDesign. If you haven’t noticed, I’m big on the DIY aspect of self-publishing!
I dove back into InDesign to convert my print layout into a reflowable EPUB. The “reflowable” part means it doesn’t have a fixed layout, letting you change the font style and size on your reader.
I won’t get into the specifics of how that works, but it’s enough to say that the file has to be properly prepared. For example, you can’t simply hit return to create a line break because that space won’t come through in your digital file.

When the EPUB works properly, I can then publish it through KDP and Draft2Digital. Again, after assigning its ISBN, metadata, etc.
Finished!
Freely Written Vol. 1 is now available in both paperback and ebook editions. Of course, you can also listen to the stories from the book, and more, on the Freely Written podcast, which is available on all the major podcast apps.
That only leaves one final, ongoing piece of the puzzle: selling the book. That’s a skill I’m still working on!
My favorite way to sell is in-person at public events. I like talking to people and helping them decide which of my books they might want to read. Unfortunately, the pandemic has made that harder. And, even if I could get out more, it’s tough to build a following when meeting every reader in person!
If you enjoy my books and podcast, it’s super helpful if you can tell your friends about them! Even better, writing reviews on Amazon is a massive help!
Self-publishing is definitely a labor of love, as they say. But I do love that being an indie author lets me have full creative control and learn a wide range of skills. It also lets me do ambitious things like pull together a new book in about two weeks!